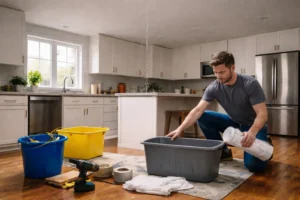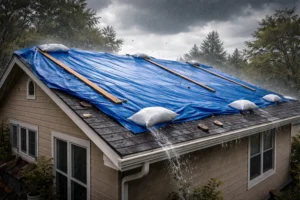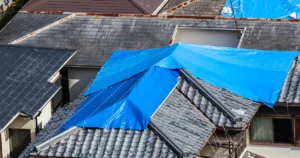
In the U.S., storms caused $165 billion in damages in 2022 alone. That’s not just a number. That’s homes ripped open, families displaced, and roofs torn apart in a matter of minutes. And when disaster strikes, you don’t have time to waste. That’s where a roof tarp comes in. A quick, reliable solution when your home needs it most.
Welcome to Roof Tarp, your go-to emergency roof tarping service available 24/7 across the US. We’ve seen it all — from hurricane-force winds peeling shingles like paper to heavy hail punching holes in rooftops. And we’re here to help, fast.
Let’s get into everything you need to know about roof tarps: what they are, how to use them, and why they matter.
What Is a Roof Tarp?
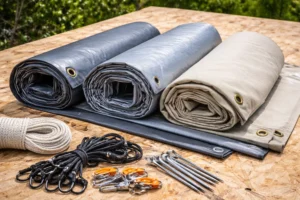
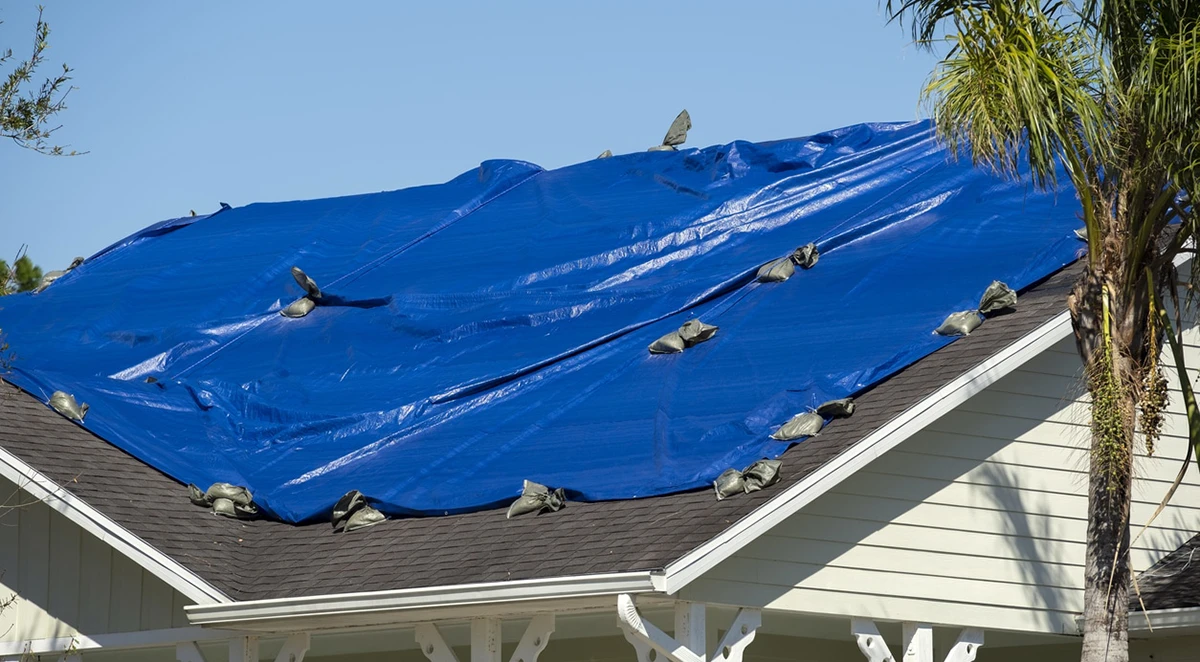
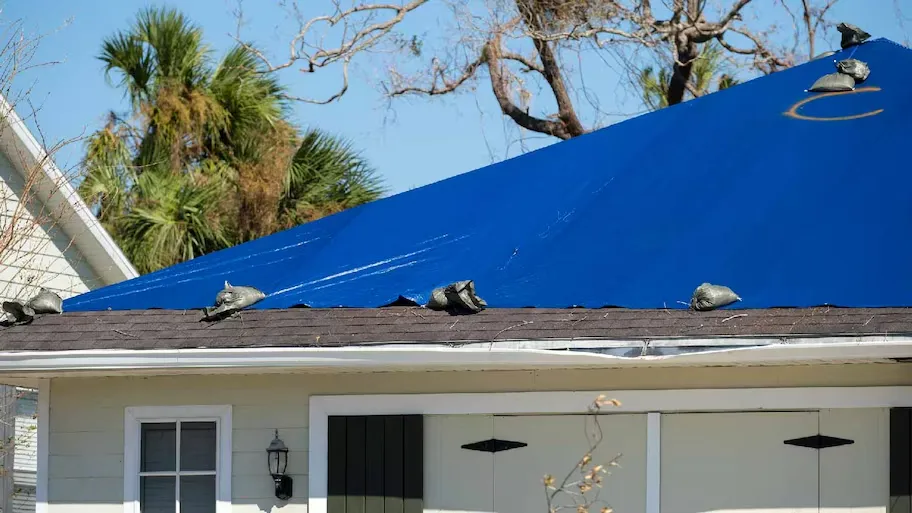
A roof tarp is exactly what it sounds like — a large, durable sheet (usually made of polyethylene or vinyl) that covers and protects your roof when it’s damaged. Think of it as a temporary shield. It keeps water, debris, and even pests out of your home until permanent repairs can be made.
But not all tarps are created equal. A blue plastic tarp from your local hardware store might work for a backyard barbecue. For your roof? You need something tougher.
What Is the Best Tarp for a Roof?
Let’s get straight to it. The best tarp for a roof is a heavy-duty, UV-resistant polyethylene tarp with reinforced grommets and a thickness of at least 10 mils.
Look for these features:
- UV Resistance – Your tarp is going to bake under the sun. Without UV protection, it’ll degrade fast.
- Waterproof – Not water-resistant. Waterproof. You want zero leaks.
- Rip-resistant – High winds and flapping edges can tear standard tarps. Go for reinforced edges and thick material.
- Rust-proof grommets – These are the holes you’ll use to tie it down. If they rust, the integrity of the tarp drops fast.
Brands like Sigman, Dry Top, and Xpose Safety offer excellent options, but what matters most is the thickness, material, and build quality.
What Kind of Tarp for Roof? (And Yes, There’s a Difference)
Polyethylene is king. It’s affordable, tough, and widely available. But there are also vinyl tarps, canvas tarps, and mesh tarps.
Here’s the breakdown:
- Polyethylene (poly) tarps – Best overall. Strong, waterproof, and UV-resistant.
- Vinyl tarps – Heavier and more durable but more expensive. Great for commercial roofs.
- Canvas tarps – Breathable but not fully waterproof. Not ideal for emergency roof coverage.
- Mesh tarps – Allow air and light through. Useless for roof tarping.
So when we say “what kind of tarp to use for roof,” the answer is clear: a heavy-duty poly tarp. Period.
What Size Tarp to Cover Roof?
Here’s a rule of thumb: always go bigger than you think.
Measure the damaged area, then add 3 to 5 feet on all sides. That extra material is essential for overlap, tying down, and coverage under roof edges.
Standard tarp sizes range from 10×12 ft to 40×60 ft. But here’s the kicker — don’t just guess. Use a tape measure. And if you can’t get on the roof safely, call us. That’s what we’re here for.
Pro tip: Keep at least one 20×30 ft tarp on hand for emergencies. It’s a versatile size that works for most residential roofs.
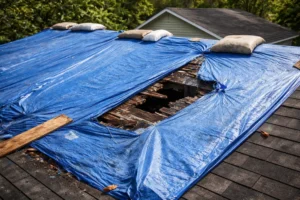
When to Do Emergency Roof Tarp
Timing is everything. Here’s when you should tarp a roof:
- Immediately after storm damage – Don’t wait for a contractor. Tarp it.
- When there’s a leak but no immediate repair scheduled – A tarp buys you time.
- Before a major storm if your roof already has weak points – Yes, proactive tarping is a thing.
If you’re wondering, “Can’t I wait until the insurance adjuster comes?” — don’t. Insurance companies expect you to protect your property from further damage. A tarp does exactly that.
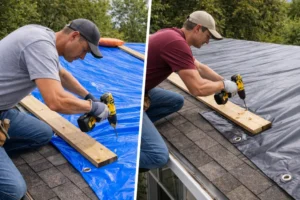
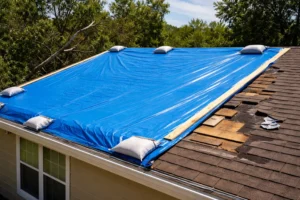
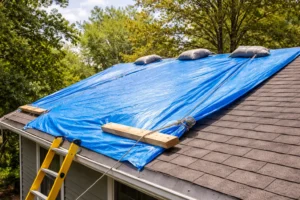
How to Attach a Tarp to a Roof
Safety first. If it’s not safe to climb your roof, call a professional. Tarping a roof isn’t worth risking your life. But if you’re experienced, comfortable with heights, and confident in your setup, here’s a more detailed breakdown:
- Clear the area – Carefully remove debris, broken shingles, and any branches. The smoother and cleaner the surface, the better your tarp will hold and seal.
- Inspect the damage – Before laying down the tarp, get a clear understanding of where the leak or breach begins and ends. This helps you decide the right tarp placement and size.
- Lay out the tarp – Center it over the damaged section, making sure it extends at least 3 to 5 feet beyond the damaged area on all sides. This extra coverage helps with anchoring and prevents wind from lifting the edges.
- Secure with boards – Take 2×4 wooden boards and wrap the tarp edges around them. Then nail the boards (not the tarp itself) into the roof, anchoring the wrapped edges tightly to the surface. This technique reduces stress on the tarp and increases holding strength.
- Double-secure the edges – If possible, use a second set of boards to go over the tarp edge and sandwich it in place. This is especially helpful in areas with high wind or steep slopes.
- Anchor with screws or sandbags – Use roofing screws if nails aren’t an option. For flatter roofs or temporary setups, place sandbags or bricks along the tarp’s perimeter to keep it grounded.
- Inspect regularly – Check your tarp every few days or after each major weather event. Look for loosening edges, pooling water, or signs of tearing.
Avoid nailing directly into undamaged shingles or through the middle of the tarp. Doing so can cause additional damage and shorten the life of both your roof and your tarp. The goal is to stabilize the area and prevent further exposure while keeping the structure intact.
Need help? Our team at Roof Tarp is trained to install protective coverings quickly and safely, without risking further damage to your home. Let us handle the climb — and the coverage.
How to Tarp Roof Without Nails
No nails? No problem. Sometimes, especially when dealing with older roofs or sensitive materials, driving nails can cause more harm than good. Thankfully, there are effective and secure methods to get the job done without poking extra holes in your roof.
Here’s how:
- Use adhesive roofing tape – Strong, weatherproof, and easy to apply. It bonds well to many roofing materials, offering a reliable seal along tarp edges or beneath overlapping layers.
- Secure with sandbags or weighted ropes – Ideal for flat or low-slope roofs. Place sandbags evenly along the edges of the tarp to keep it from flapping or shifting in the wind.
- Use bungee cords and grommets – These are especially useful for anchoring tarps to secure objects like chimneys, vent stacks, or framing structures. Bungees offer just enough give to handle wind gusts without tearing the tarp.
- Utilize paracord and surrounding features – In some cases, you can run paracord through grommets and tie off to railings, gutters, or strong anchor points around the roof’s perimeter.
These no-nail methods are perfect when you want to avoid further damage, are in a holding pattern with your insurance company, or simply don’t want to introduce new entry points for water.
But remember — even no-nail tarping requires tension, weight, and smart placement. Done right, it’ll hold tight and buy you precious time. Done poorly, it can fail fast. If you’re unsure, our pros at Roof Tarp can install a secure, no-nail solution that protects your roof and keeps your coverage intact.
How Long Does Roof Tarp Last?
This depends on the quality of the tarp, how it’s installed, and the weather conditions it faces. Some tarps might not survive a week during severe storms, while others can stand strong for months.
Here’s a general breakdown:
- Basic tarps – These are your typical blue plastic tarps, and while they’re cheap and easy to find, they aren’t designed to take much abuse. Expect 7 to 14 days in rough weather, and perhaps up to a month in mild conditions.
- Heavy-duty tarps – Typically 10 to 16 mil thick with reinforced grommets and UV coatings. These can last 30 to 90 days, even through multiple storms, if properly secured.
- Professional-grade vinyl tarps – These are thicker, more durable, and built to handle industrial demands. With expert installation, they can last up to 6 months or more without tearing or breaking down.
Keep in mind, the lifespan of a tarp also depends on:
- Sun exposure – UV rays degrade material quickly. Tarps with UV inhibitors last longer.
- Wind and debris – Constant movement and sharp edges can rip or puncture a tarp.
- How well it’s secured – A loosely installed tarp will flap, tear, and degrade much faster.
And here’s the real talk — a tarp is a temporary fix, not a permanent patch. It’s your stop-gap solution, your emergency defense, and a critical buffer between your home and the elements. It buys you time to line up the permanent repairs you need, whether that’s days or weeks away.
Want to make your tarp last longer? Invest in quality, use proper installation methods, and don’t wait too long to schedule repairs. We’re here to help with both the short-term protection and the long-term plan.
Frequently Asked Questions (FAQs)
Can I install a roof tarp by myself?
Yes, but only if it’s safe to access your roof. Use proper safety equipment, avoid steep or slippery areas, and follow our step-by-step guide. If there’s any risk, call professionals like Roof Tarp to handle it safely.
Will insurance cover the cost of tarping my roof?
Most homeowners’ insurance policies will cover emergency roof tarping as part of your damage mitigation efforts. Just be sure to document the damage and the tarp installation with photos.
How quickly should I tarp my roof after damage?
Immediately. Waiting even a few hours can lead to more water damage, mold, and costly repairs. The sooner you act, the better.
What’s the cost of a professional roof tarping service?
Prices vary depending on roof size, accessibility, and location, but emergency tarping typically ranges from $200 to $1,000. At Roof Tarp, we provide upfront pricing with no surprises.
Do I need to remove the tarp before getting my roof repaired?
No. Most roofers will remove the tarp as part of their prep work. Just let them know it’s in place to prevent confusion.
Can I reuse a roof tarp?
If it’s still in good condition — no rips, holes, or UV damage — yes, you can reuse it. But always inspect carefully before trusting it again.
What if it rains while I’m trying to install a tarp?
Avoid tarping during active storms. Wet surfaces are dangerous. If the weather clears up temporarily and you can do it safely, proceed — otherwise, wait or call in pros with the right gear.
Wrapping It Up: Emergency Roof Tarp
If your roof’s in trouble, a tarp is your first line of defense. It protects your home, your belongings, and your sanity. And when every minute counts, having a team like the 24/7 Emergency Roof Tarp on speed dial makes all the difference.
We’re not just a service. We’re a safety net — ready for an emergency roof tarp 24/7, rain or shine, anywhere in the U.S. Whether it’s 3 a.m. after a surprise thunderstorm or mid-day during a heatwave, we’re prepared to roll out, assess the damage, and protect your property without delay.
Tarping your roof isn’t just about covering a hole — it’s about stopping further destruction in its tracks. It’s peace of mind when your life has been turned upside down. That’s why our team doesn’t just show up — we show up with solutions. With professional-grade tarps, secure installation, and trained pros who know how to work fast and safely, we’ve got your back.
We also work with insurance companies, provide detailed photo documentation, and help homeowners understand what comes next. Because yes, tarping is temporary — but your peace of mind shouldn’t be.
When the storm hits, don’t hesitate. Tarp it. Then call us. And rest a little easier knowing help is already on the way.